September 21, 2012

Friday Freebies!

I am always saying "I love you to the Moon and Back" when I put Cooper to bed. He normally says, I love you the moon and sun and back. Well, the other night, he said "I love you to the moon, sun and even to the Frankische Wunderland and back." Ha! So funny. The Frankische Wunderland is one of his favorite places to go. It is a small theme park about 30 minutes away. We always tell him to take a nap on the way because it's a long way, so he almost always does. Love that boy! I might have to make a special poster for his room that says that. Precious.

I still have about 5 open projects in the house I am working on. Several are for Cooper's room! Here are some prints I made for his room. If you want one, let me know what quote and color you'd like, and I'll see what I can come up with.


Yes, I made a typo above. I'll have to fix that.


September 18, 2012

Fall Shirts

Cole always wants to wear something that matches his brother and sister or that matches me and/or Jacob or that matches a superhero! So, he saw some "fall" onesies I had made for the twins and also wanted a "fall" shirt. I had some fabric paint pens and a plain white shirt, so now we just needed a touch of fall. While the twins were napping, it was the perfect time for Jacob to take a brief walk with Cole and find some durable leaves. Then we simply squeezed some fabric paint onto paper and painted the leaves. We first practiced on the paper, Cole's favorite part, and then stamped the leaves onto the shirt. For the twins, I saw these two appliques from the Hobby Lobby and ironed them on. Total cost - $12.


Tower of Power Kids Playhouse

While mom and I were busy making pillows and painting furniture, Frank was  busy building an awesome fort for Cooper! We have been talking about doing this all summer. When we looked at prices for wood and a slide, we said forget it...They were about 400 euros just for the slide! Then, mom and I found this old slide on the side of the road during bulk item pick up day! Yes! It was perfect! Frank and I held it on top of the car and brought it home that night.

Frank isn't finished, but here is the fort so far. He is painting it green, adding side railings, and a roof eventually. Cooper loves it! Three climbing walls, and an area underneath where he can paint/draw and hide etc. We might even add an extension with a swing on it for next summer.


Our nice nieghbor across the street that owns a beer store (very convienent I must say) gave us the wood! He owns a packing/crate company. I need to have him over for dinner seriously. Wood is not cheap over here.

Now, if we can just figure out a way to build a climbing wall in our attic for winter. The nearest gyms are an hour away and winter is fast approaching. I hope we have 1 more month of fall at least. September has been perfect.


September 17, 2012

French Pillows- CitraSolv Tutorial

We've been busy lately, but always at night when I can't take good pictures of the things we've made! I apologize. iPhone pics at night aren't the best. Here is a Tutorial on transferring images with with CitraSolv! I love this stuff. I have made so many pillows and 2 T-shirts now with the liquid.
Here are the Steps:

1. Buy Citrasolv. This is what it looks like.

You can buy it at health food stores, but my mom brought me some when she came to visit from the states that she ordered online through amazon. She couldn't find it at Trader Joes. Perhaps Whole Foods or Fresh Market might have it though.

2. Pick out an image to transfer to fabric.

I printed a bunch of great graphics from the Graphics Fairy. She has great tutorials on how to transfer images 12 different ways, and so many amazing ideas and images. I almost don't want to share since I am going to be making a lot of Christmas presents using these techniques and her blog! The pillows I made are all images from her website. We made the pillow from old linen napkins I had in my china cabinet. I love the French look, so I picked out all French images. I had to print the images reversed when they had words. I used a tonor printer to print the images and they worked out fine. I also copied some images on a photo copier, and they came out even better. The ink was darker and transferred more evenly.
3. Transfer the Image using Citra Solv. You simply put the image on your fabric ink side down, and then tape it down so it won't move. Brush the citrasolv on so the paper is damp all over the image you are transferring and then rub hard with the back of a spoon to transfer the image from the paper to the fabric. My mom used a credit card to rub.

4. Remove the Paper. Voila! Your image will be transferred from the paper to the fabric!

5. Iron the Fabric.  Iron the image or throw it in the dryer to help make the ink stay permanetly.


Warning: The citrasolv does smell quite strong, so doing this by an open window is preferable. It smells good, but, you'll see. Made the whole house smell  lemony/orange for quite a while!

I'll post some pictures of T-shirts and other stuff I have made soon. It does work on colors! I tried and it worked out great! The Citra Solv does a great job of getting the vintage look since the whole image doesn't transfer perfectly.

September 11, 2012

Pumpkin Chocolate Chip Cookies!

My first attempt at a post. Not only is blogging new to me, free time is even more new! Finding time to do things I enjoy with a pilot for a husband and three little ones is sometimes a challenge. But with fall coming, I have been enjoying baking banana bread, cake pops, cookies etc. A recent batch of cookies was a success - even my 3 1/2 year old liked them. They are pumpkin chocolate chip cookies - delicious and nutritious!


There are multiple recipies out there to try, but this one is worth your first attempt. 

Preheat oven to 350 F. 

Mix:
1 cup pumpkin
2 eggs
1 cup oil
3/4 cup sugar
1 tsp vanilla
2 tsp cinnamon
2 cups flour
1 tsp baking soda
2 tsp baking powder
2 cups chocolate chips

Drop by spoonfulls and bake for approximately 12 min.

They are a cross between pumpkin muffins and chocolate chip cookies. Enjoy!


September 9, 2012

Fall Pillow Tutorial

Fall is here!  The birches and oaks are bright yellow now. Nights are quite cool and days are so crisp! Love it. Although, it might snow this weekend. Don't love that.

While rummaging through my old napkins in my linen cabinet, we found these off-white linen napkins.  I never use them.  With my new sewing machine, we decided to put them to good use and make some fall pillows!

First I grabbed maple, oak, sycamore, and gum tree leaves from the neighborhood while walking the dogs.

Then I picked a few fabric paint colors that matched the leaves (oranges, reds, yellows).

 I painted the leaves using a paint brush, pressed them on paper to test and get rid of extra paint, then on to the napkins and let them dry over night.

Here is a close up of a sweet gum leaf.  Some paint globbed a little, but not too much. I then threw the napkins in the dryer for 15 minutes on high so the paint would be permanent.

After that, I sewed the napkins together and stuffed in an old cheap IKEA pillow I had on hand. I should have done an envelope pillow, but didn't have enough fabric with the napkins. I can always slip an envelope cover over this pillow for the next seasons/holidays.

Enjoy!


Painted Chest


After 2 months of waiting, I finally received my Annie Sloan Chalk Paint! What an ordeal. I ordered the paint from the states, only to find out that they couldn't ship the order 2 weeks later because it was considered hazardous (I guess the wax is flammable). I finally found the one and only dealer in Germany online was in Berlin, and ordered through them. A week later, my package still had not arrived and when I looked up the tracking number, found out that the package was "damaged". Great... I reordered and they were out of the Old White I wanted and the clear wax!  Its all okay now. I have my 4 colors, and both waxes, and managed to get a liter of paint for free out of it all and 2 waxes free and a sample of Old Violet free. Score!

One thing I noticed though which I was a bit upset about was that the wax label of Annie Sloan's was paper, and underneath was the true brand/wax. I called about it and found out that when Annie Sloan runs low on the waxes, this distributer makes them and sends them with her label? They told me it was the same wax though. I am confused... Not sure if I lost something in translation or if this is the same company perhaps Annie Sloan uses to make her waxes? Anyone else know more about this?

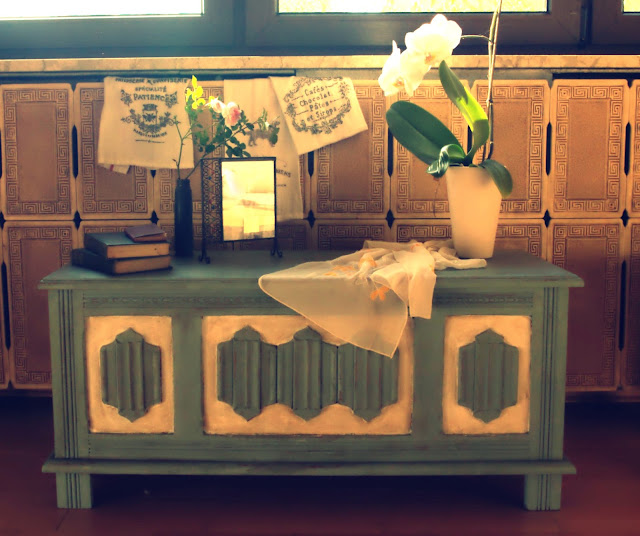
So, even though I am working on about 4 things right now, I had to bust out the paints to try them out. This is what I worked with first. An old chest I bought at a thrift store in Garmisch, Germany. I wanted to try out the paints on something not too sentimental for my first go... Here is a before picture.


We decided to use Annie Sloan Duck Egg for the majority of the chest, and Annie Sloan French Linen for the rest. I didn't have Old White or I would have used that. I used the clear wax first and then debated using the dark wax. So glad I did! The white was much too white before, and the dark wax really brought out the wood grain. Love it. We used some amazing images from the Graphics Fairy and transferred them onto some IKEA napkins this weekend as well, and made pillows that I'll blog about soon. Mostly when the kids were asleep. Another picture with different lighting....I think I might still stencil images on the sides and back, so more pictures to come once I finish that project.


Annie Sloan Chalk paint really is as great as everyone raves. The paint is so forgiving! If you make a mistake, rub it off or paint over it! And the sanding was so easy to make it look "old".  I love the Duck Egg color and think the Dark wax makes it even better, for this piece at least. I can't wait to do more! I have Country Grey and Louis Blue to try out next! I'm linking up to these parties below :)


September 4, 2012

Top Ten Things to Do in the Lexington Area with Kids

We used to live in Lexington, Kentucky before moving to Germany. These ten places were our favorites to take the kids. All are in Lexington Kentucky or very close by (within a 10 minute drive).

1) Visit the Explorium!. Lexington's Children Museum. My son's favorite part was always the amazing bubble room!
2) Visit the Arboretum and check out the Kentucky Children's Garden Area. The stream is awesome for the kids to play in, and they can pick the vegetables!
3) In summer, play in the fountains in front of the courthouses on South Limestone.
4) For winter days, head over to Joseph Beth . An awesome book store and gift store with a reading hour, trains, toys, and even a fountain area in the hallway to entertain your kids.
5) Paint some pottery at Mad Potter and make gifts for the grandparents using their hand prints etc.
6) Visit the Kentucky Horsepark especially at Christmas time when they have the Southern Lights Holiday Festival (awesome lights, petting zoo, crafts for sale, pony rides etc.).
7) Go to Boyds or Evans Orchards! Pick apples and peaches and other fruits in season, and enjoy the awesome play areas they have for the kids! The perfect time is fall when you can pick pumpkins, take hay rides, eat caramel apples, and do the corn mazes etc. They even have petting zoos with camel rides.

8) Check out Lexington's creative playgrounds at Shilito Park or Jacobson Park. Jacobson Park has a large pond as well for feeding ducks and paddle boats and they have fun events all summer long (like movies in the park).
9) Check out Monkey Joes! My son loved this place and it was our special treat for him when he behaved exceptionally well. Full of slides and bouncy castles.
10) Go to Ecton Park every Tuesday night for Jazz in the Park all summer long. We loved bringing our picnic basket and blanket and stretching out to hear the jazz, and Cooper loved the park and music and kids running around.


I have a Sewing Machine!

Just finished a lovely three day weekend at home. We thought about heading to Berlin or Vienna, but then decided taking it easy would be best for us all. We kept busy for sure though and enjoyed it. Saturday, mom and I visited IKEA in Furth and stocked up on crafting supplies! I could have bought so much more, but went with a limit of cash in my wallet. In Germany, you can only pay cash or with a German debit card (which I don't have), so it makes it easy to stay conservative... The night before, I had my mom drooling over some pillows to make, but I whined again how I can't sew and don't have a machine. She said "I wonder if Ikea will have a sewing machine". I laughed. No way. They don't sell many electronics. Sure enough, the first thing we find in one of the exhibit rooms was a sewing machine for 69 euros! Sold. I couldn't believe it! YES! I am going to learn to sew! Mom made two pillowcases this weekend, and I watched. I will take my attempt at the machine this week. The machine is small and so cute and pretty simple. But, we still managed to waste an hour figuring out how to thread the machine and fix the bobbin holder (I don't know the proper terms yet obviously) when it got stuck on the felt we were using. Oh, and the darn directions for the machine are in German, French, and Dutch! No English. At least there are descriptive pictures to assist.

After getting the kids to bed, this is what mom and I worked on :) We followed the wonderful tutorial from Classy Clutter and it worked out perfectly!


Can't wait to make a few more for gifts! It makes such an improvement in my living room. We made quite a few more things this weekend that I will post about this week once I take some decent pictures. I think the total cost was $9 for the felt and down pillow insert I bought at Ikea.

More to come soon!